


Working for the liberation of all beings everywhere. Bringing higher consciousness to the planet, one eternal moment at a time.
Chapter 44
Take the Copper Challenge
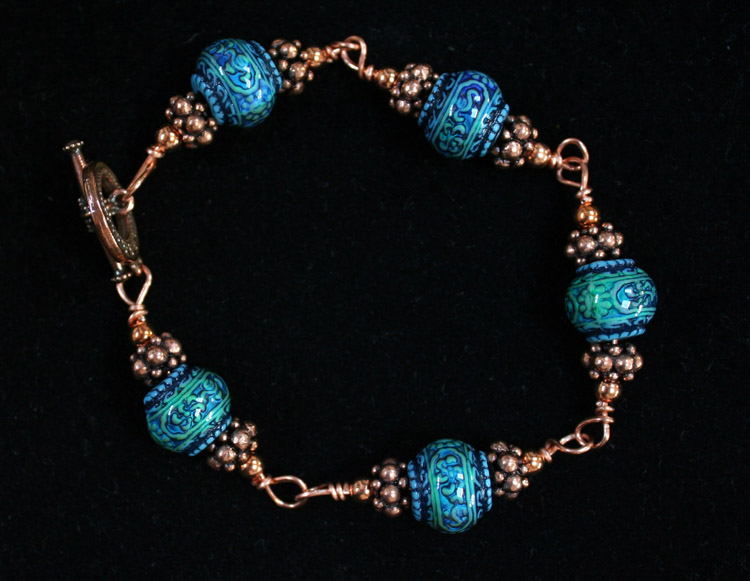
Normal Blue Emo-Indicators are sparked by Ancient Style Copper Hedgehog Beads.
NORMAL BLUE MEDITATION BRACELET KIT -- $49.95
The EMO INDICATOR beads turn colors when worn. Many years ago, a primitive version of this bead was called a "Mood Ring". The space-age materials used now are very much lighter and more resistant to wear. NORMAL BLUE is a meditation device attuned to the Schumann Harmonic. Keep in the Blue and enjoy Deep Meditation & Infinite Harmony. Here's how to construct your Normal Blue Meditation Bracelet:
- Cut FIVE 4" lengths of .20 gauge copper wire, which will form the cores of the bracelet. No need to flush cut these at this time.
- About 1" from one tip of one of the wires, FORM A LARGE, GENEROUS LOOP and THREAD the wire through the SMALL HOLE of the LARGE ROUND PART of the bracelet clasp that came with the kit.
- WRAP the wire tail around the core wire to keep the loop stable and to hold the clasp firmly, as shown in the photo.
- THREAD ON one of the 4mm solid copper rounds that come with the kit, and let it fall against the wire you wrapped to make a small coil. Refer to photo.
- Now THREAD on one of the 9mm copper Hedgehog beads.
- Next THREAD on one of your NORMAL BLUE Emo beads.
- Now THREAD on another 9mm copper Hedgehog bead.
- ADD a final 4mm copper round bead, to complete the stack.
- At a distance of about 3mm or 4mm from the stacked beads, FORM A LOOP, leaving enough wire "tail" to wrap the end 2 1/2 times, then FLUSH CUT the end tight to the wrappings.
- TUCK both wire ends deep inside the wrap so no sharp points or edges stick out.
- START another 5-STACK ELEMENT by threading the next element's CORE WIRE through the LOOP in the first element.
- Complete the LOOP by wrapping the wire around itself 2 1/2 times.
- FLUSH CUT the wire at the end of the wrap and tuck it down in so it has no sharp points or edges.
- MAKE and link FOUR MORE of these elements, a total of FIVE ELEMENTS in all.
- THE LAST ELEMENT should LINK DIRECTLY onto the LOCKING END of the BALI STYLE FANCY CLASP, included in the kit.
- CHECK and TUCK IN all remaining ends and bits to assure nothing sharp or catchy is on the bracelet. Any problems MUST be addressed NOW, not later, when the customer throws the bracelet on the counter and demands satisfaction.
And that's all there is to it! NOTE that the beads should be TIGHT in the packed stack of beads, not loose, not wiggly, not waggly, TIGHT but not under pressure. This is very important when setting GLASS or delicate gemstones. How to get that special tightness is a matter of time, dedication and rapidly developing skills.

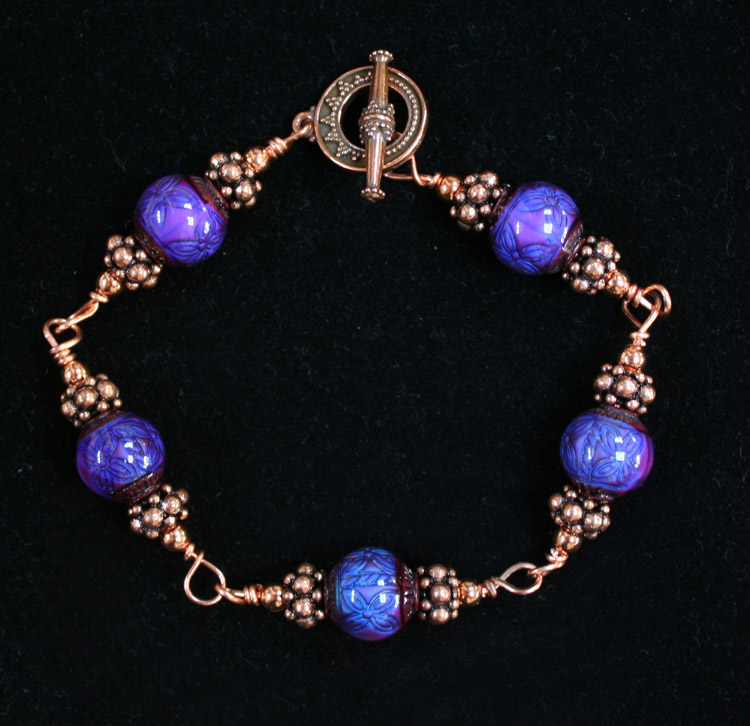
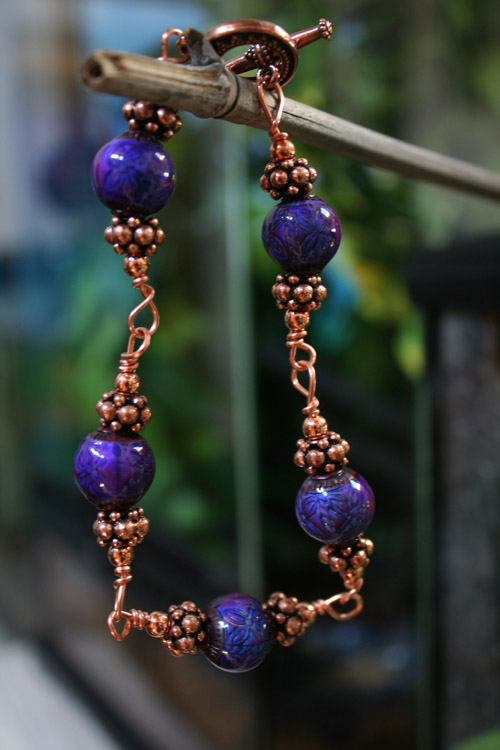
ATLANTEAN NORMAL BLUE bracelet assists in achieving deep levels of communication.
ATLANTEAN NORMAL BLUE BRACELET KIT -- $49.95
The NORMAL BLUE EMO BEADS are much larger in this bracelet than on the NORMAL BLUE regular bracelet, and beautiful LOTUS CAPS have been added. There are no Hedgehog beads in this configuration. The beads have a carved MERMAID figure and are very sensual in feel. Here's how to make this fascinating and useful meditation device:
- CUT five 5" long pieces of .20 gauge wire to form the CORE wires. This bead is a full 20 mm wide, so you'll need the bit of extra slack in the wire.
- FORM A LOOP with a 1" tail and THREAD the wire through the SMALL HOLE of the LARGE ROUND PART of the Bali Style BRACELET CLASP that came with the kit.
- FINISH THE LOOP and WRAP the tail 2 1/2 times and FLUSH CUT the end close to the wrapped coil.
- STACK your beads -- 4mm round, LOTUS CAP, EMO bead, LOTUS CAP, 4mm round.
- FINISH the element by creating a LOOP and wrapping the tail 2 1/2 times, then FLUSH CUTTING the end close to the coil.
- THREAD the second wire through the SECOND LOOP of the first ELEMENT, and FORM A LOOP.
- FINISH THE LOOP by winding or wrapping the wire around itself 2 1/2 times, then FLUSH CUT the wire close to the coil so it doesn't stick out.
- ADD BEADS as above, and repeat this until you have made four ELEMENTS, all LINKED TOGETHER.
- The FIFTH ELEMENT must be linked first to the FOURTH ELEMENT, then at the finish, LINKED to the STRAIGHT LOCKING BAR of the bracelet clasp included with the kit.
- Now all links must be checked for any sharp parts, ends of cut wires that might still be sticking out. A quick check with the thumb and forefinger could result in serious injury, so be gentle, not rough, when determining whether there's a problem or not.

Egyptian Lotus & Papyrus Blossom Bracelet.
EGYPTIAN LOTUS & PAPYRUS BLOSSOM BRACELET KIT -- $49.95
This graceful and elegant bracelet is reminiscent of the bracelets worn by many ancient Egyptians, including you. The NORMAL GREEN pattern will show you when you're "on" and when you're "off" the beam. Opening up to this ancient culture is one of the best experiences you can have in a Planetary Organic Body and still live and breathe. It's the next-best thing to a Time Machine. Here's how this stunning bracelet is constructed from the kit:
- CUT five pieces of 4" long .20 gauge copper wire.
- FORM A LOOP with a 1" tail and thread it through the SMALL HOLE of the LARGE ROUND PART of the Bali Style Clasp that came with the kit.
- WRAP the tail of the loop, and FLUSH CUT near the coil.
- THREAD ON a 4mm round copper bead.
- THREAD one of your LARGE HEDGEHOG copper beads.
- Now THREAD ON your EMO bead.
- ADD another Hedgehog bead.
- ADD a final 4mm round copper bead.
- CLOSE THE LOOP and WRAP it by winding it around itself, as shown in photo.
- BEGIN A SECOND ELEMENT by threading the second CORE WIRE through the SECOND LOOP of the FIRST ELEMENT.
- Do this until the FIFTH ELEMENT, then pass the wire through the LOCKING BAR of the Bali Style Clasp included with the kit.
- WRAP the wire and TUCK the wire end down into the coil.
- CHECK for any sharp points, and tuck them down into the coil without spoiling the link. If you mess up a link by tucking down the wire end, cut it away and DO IT OVER.
Purple Haze Healer's Helper Bracelet is my most active meditation device.
PURPLE HAZE HEALER'S HELPER BRACELET KIT -- $49.95
Definitely the all-time favorite of everyone to whom I've shown the EMO Indicator bracelets. Far and away the most popular, it's also the most active, and has a number of terrific applications including ghost-hunting and treasure-finding as well as healing. Here's the simple way to make this great psychic-sensitive bracelet:
- Cut FIVE 4" lengths of .20 gauge copper wire, which will form the cores of the bracelet. No need to flush cut these at this time.
- About 1" from one tip of one of the wires, FORM A LARGE, GENEROUS LOOP and THREAD the wire through the SMALL HOLE of the LARGE ROUND PART of the bracelet clasp that came with the kit.
- WRAP the wire tail around the core wire to keep the loop stable and to hold the clasp firmly, as shown in the photo.
- THREAD ON one of the 4mm solid copper rounds that come with the kit, and let it fall against the wire you wrapped to make a small coil. Refer to photo.
- Now THREAD on one of the 9mm copper Hedgehog beads.
- Next THREAD on one of your NORMAL PURPLE Emo beads.
- Now THREAD on another 9mm copper Hedgehog bead.
- ADD a final 4mm copper round bead, to complete the stack.
- At a distance of about 3mm or 4mm from the stacked beads, FORM A LOOP, leaving enough wire "tail" to wrap the end 2 1/2 times, then FLUSH CUT the end tight to the wrappings.
Beautiful Purple Haze has finely etched lines of the Honey Bee.
- TUCK both wire ends deep inside the wrap so no sharp points or edges stick out.
- START another 5-STACK ELEMENT by threading the next element's CORE WIRE through the LOOP in the first element.
- Complete the LOOP by wrapping the wire around itself 2 1/2 times.
- FLUSH CUT the wire at the end of the wrap and tuck it down in so it has no sharp points or edges.
- MAKE and link FOUR MORE of these elements, a total of FIVE ELEMENTS in all.
- THE LAST ELEMENT should LINK DIRECTLY onto the LOCKING END of the BALI STYLE FANCY CLASP, included in the kit.
- CHECK and TUCK IN all remaining ends and bits to assure nothing sharp or catchy is on the bracelet.

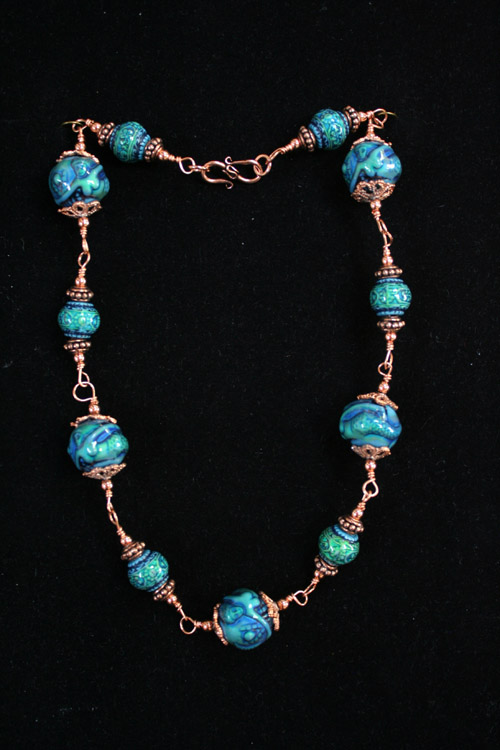
EMO INDICATOR BEADS form this Egyptian-Style Broadcollar.
EMO-INDICATOR EGYPTIAN STYLE BROADCOLLAR KIT -- $89.95
These stunning ancient style EMO beads are absolutely incredible. Add the fact that they are EMO BEADS reflecting your MOOD at THIS VERY MOMENT, and they are an unbeatable combination of desirability and fascination. Guaranteed that nobody has one of these, this is definitely for someone who "has everything". Here's the easy way to build this kit:
- FLUSH CUT BOTH ENDS of a single 20" long piece of .16 gauge copper wire, and FORM A LOOP at one end, making certain the loop is straight and that no sharp parts stick out. Put this aside for the moment.
- FLUSH CUT BOTH ENDS of SIXTEEN (16) pieces of .16 gauge copper wire to form the DROP WIRES.
- FORM A SIMPLE LOOP -- NO WRAPPING!!! -- at ONE END of each of these DROP WIRES. Do NOT make a second loop on the other end at this time!!! Just form this first loop and set aside until all sixteen drop wires have ONE LOOP each. I know it's a hard point to catch, but PLEASE pay attention here -- if you put in a second loop now, you can't load your beads on.
- FEED one of your 32 COUNT COPPER BALI STYLE SPACER BEADS that comes with the kit onto one of the DROP WIRES.
- ADD an EGYPTIAN STYLE EMO bead.
- ADD a copper spacer bead.
- MAKE A CLOSING LOOP at the bottom.
- REPEAT THIS until all 16 DROPS have been made.
- ATTACH the drops to the LONG WIRE you prepared in the beginning, by feeding on TWO of the CZECH MAUVE WOOD beads, then ONE DROP, then TWO WOOD BEADS, then ONE DROP, all the way to the end, adding a final TWO WOOD BEADS to finish the drop load onto the choker or collar.
- Now MAKE A VERY SMALL LOOP in the open end of the CHOKER WIRE and reverse the roll, as shown in the photo, to make an ancient-style CLASP. Modern folks might need help opening and closing this unusual and very archaic type of clasping choker.
- You can substitute an S-Type Bali Style Clasp here if you prefer. It's INCLUDED IN THE KIT. If you don't use it here, you can use it to make another necklace.
BLISSFUL DREAMING NECKLACE brings deep relaxation into reach.
BLISSFUL DREAMING EMO-INDICATOR NECKLACE KIT -- $99.95
What makes this stunning EMO-Indicator necklace so special is the COMBINATION of great EMO beads -- both of which are the most beautiful COBALT BLUE in the NORMAL MODE. If you can Keep to the Blue when wearing this necklace, you will be IN THE RANGE of DEEP MEDITATION. I wouldn't wear this to bed, but BEFORE retiring, you might have it on for a while. Here's how to make this $450 retail value necklace:
- CUT ELEVEN (11) pieces of 4" long .20 gauge copper wire to make your LINK WIRES. No need to flush cut these at this time.
- FORM A LOOP on the first of these LINK WIRES and PASS the LOOP through one of the SMALL RINGS on the sides of the Bali-Style Necklace Clasp that comes with the kit. Look carefully at the photo above to see how to do this correctly.
- WRAP the tail of the loop 2 1/2 turns and FLUSH CUT and TUCK DOWN the tip of the wire into the coil.
- FEED a 4mm copper round bead onto the open end of the LINK WIRE you just formed.
- ADD a BALI STYLE SPACER bead as shown in photo.
- ADD a SMALL EMO BLUE bead.
- ADD another SPACER bead.
- ADD one more 4mm copper round bead.
- CLOSE the FIRST ELEMENT by forming a CLOSING LOOP and wind the tail of that loop, then FLUSH CUT close to the coil and TUCK DOWN the tip of the wire into the coil.
- CONNECT the next wire to the SECOND LOOP of the first ELEMENT before making that new loop on the SECOND ELEMENT. Don't forget to connect each element by hooking the new loop onto the closing loop of the previous element, BEFORE closing the new loop, or you'll have to do it again. This is a hard lesson to learn, but you WILL learn it after many mistakes.
- LOAD ON one 4mm round copper bead, then a BALI STYLE BEAD CAP, then a LARGE EMO BEAD, then another BALI STYLE BEAD CAP, then another 4mm round copper bead, then CLOSE THE ELEMENT by making a CLOSING LOOP.
- WRAP the tail of the looping wire 2 1/2 times, and FLUSH CUT, then TUCK in the end of the wire into the coil so it doesn't stick out and hurt anyone.
- CONTINUE ALTERNATING LARGE AND SMALL EMO BEADS on each ELEMENT, until you reach the FINAL ELEMENT, Element 16.
- Here you must insert the LAST LOOP into the OTHER RING of the BALI STYLE CLASP that came with the kit.
- WRAP the tail and TUCK in the end.
- CHECK the entire necklace for anything sharp or bothersome, and TUCK those in with your needlenose pliers.
Do take the time to L@@K really carefully at the photo to see whether what you're doing is the right thing. If you really can't figure it out, there are videos available, and you can call or email for help.
ROMAN GREEN GLASS & EMO BEAD NECKLACE KIT -- $119.95
Yes, it's not cheap, but those are real ancient 2,000 year old Roman glass beads from Jerusalem, guaranteed genuine. Keep the EMO bead in the Blue and send your vision back 2,000 years into the past. Here's how to make this incredible and rare necklace. Again, this is one gift that someone who has everything definitely will not have!!!
- CUT ELEVEN (11) pieces of 4" long .20 gauge copper wire to make the LINK WIRES. No need to flush cut these at this time.
- FORM A LOOP on the first LINK wire, and don't forget to THREAD IT THROUGH the small SIDE RING on the BALI STYLE NECKLACE CLASP included with the kit.
- THREAD ON one 4mm round copper bead.
- ADD one BALI STYLE GRANULATION SPACER.
- ADD one ROMAN GREEN GLASS BEAD.
- ADD another Bali Style Spacer.
- ADD one more 4mm round copper bead.
- CLOSE THE ELEMENT by making the closing loop.
- REPEAT THIS four more times, making a total of FIVE ELEMENTS all linked together. Don't forget to LINK each new element BEFORE YOU CLOSE THE LOOP!!!
- On the SIXTH ELEMENT, make sure to load on a 4mm round, then your BEAD CAP, then your EMO BEAD, then another BEAD CAP, then a final 4mm round, then CLOSE the element by making a closing loop, of course wrapping the tail as usual, and tucking in the end of the wire as you go.
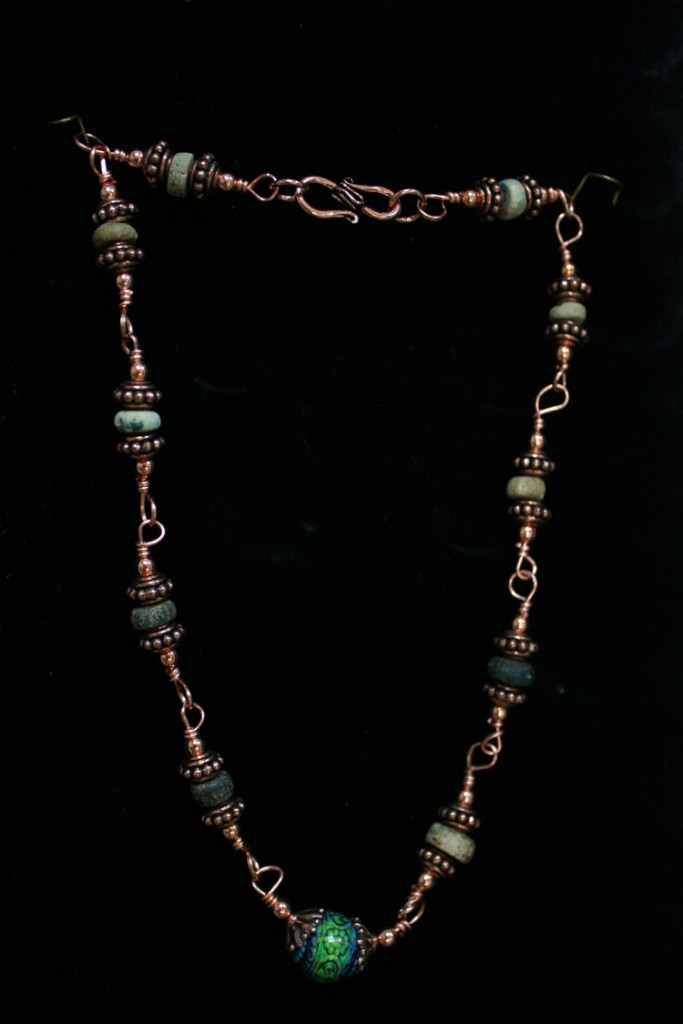
- The SEVENTH ELEMENT goes back to the previous element style, as shown in the photo. There are FIVE SIDE ELEMENTS on either side of the FEATURE BEAD, which is, in this case, the EMO bead.
- The LAST ELEMENT wire is passed through the other ring of the clasp to finish the necklace.
- CHECK EVERY PART to make certain that all sharp parts are tucked safely away.
That's all there is to it, and you have a RARE necklace that can sell for a LOT more than it cost you to build it!!! I have sold necklaces like this, in copper, for as much as $650, and with a little luck, a good jewelry market and a good responsive crowd in a gallery setting, you might be able to do the same! Even if you only make twice the cost, you're ahead of the game!!!
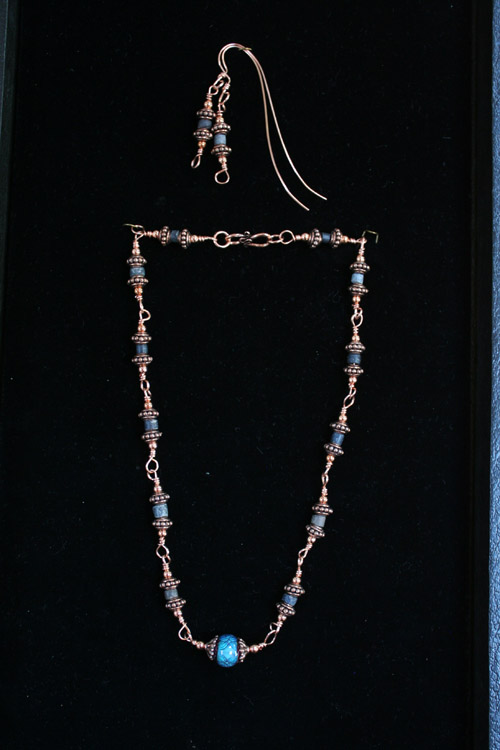
Super Rare Sumerian Hematite EMO NECKLACE gallery price is $650.
SUMERIAN HEMATITE EMO NECKLACE & EARRING KIT -- $149.95
Sumerian Hematite, especially from the Susa at Uruk, is rare and expensive. Check out the prices on eBay for this type of ancient stone bead, and you'll wonder how I can do it. I bought them by the kilo back in 1972, is how, and these are the few remaining Sumerian beads in my collection. When they're gone, they're gone. There are no affordable replacements, and the market is now flooded with fakes. A close inspection with a loupe will reveal the marks of hand-manufacture of these beads over 4,500 years ago.
- CUT ELEVEN (11) pieces of 4" long .20 gauge copper wire to make the LINK WIRES. No need to flush cut these at this time.
- FORM A LOOP on the first LINK wire, and don't forget to THREAD IT THROUGH the small SIDE RING on the BALI STYLE NECKLACE CLASP included with the kit.
- THREAD ON one 4mm round copper bead.
- ADD one BALI STYLE GRANULATION SPACER.
- ADD one ROMAN GREEN GLASS BEAD.
- ADD another Bali Style Spacer.
- ADD one more 4mm round copper bead.
- CLOSE THE ELEMENT by making the closing loop.
- REPEAT THIS five more times, making a total of SIX ELEMENTS all linked together. Don't forget to LINK each new element BEFORE YOU CLOSE THE LOOP!!!
- On the SEVENTH ELEMENT, make sure to load on a 4mm round, then your BEAD CAP, then your EMO BEAD, then another BEAD CAP, then a final 4mm round, then CLOSE the element by making a closing loop, of course wrapping the tail as usual, and tucking in the end of the wire as you go.
- The EIGHTH ELEMENT goes back to the previous element style, as shown in the photo. There are SIX SIDE ELEMENTS on either side of the FEATURE BEAD, which is, in this case, the EMO bead.
- The LAST ELEMENT wire is passed through the other ring of the clasp to finish the necklace.
- CHECK EVERY PART to make certain that all sharp parts are tucked safely away.
- To make the earrings, merely create two links and attach them to ear wires, either ready-made or home-made, your choice. I always include a pair of factory-made surgical steel gold-color ear wires for those who prefer them.
I'll post more projects as photos become available.